
If you send the same kind of document over and over — a certificate, an offer letter, a consent form — re-uploading the PDF and re-placing every field each time is wasted motion. Templates fix that: prepare the document once, and every future send starts from a finished blueprint. This guide walks through creating a template, mapping its fields to roles, adding merge variables, and then using it to create a single document or hundreds at once with bulk send. The running example — a Certificate of Employment for a fictional company, Coconut Co — is the same one in the screenshots throughout, and every name in them is fictional.
What a template is in GingerDocs
A template is a PDF plus everything you would otherwise rebuild every time you send it: the fields placed on the page, the roles those fields belong to, and the variables that fill in the details that change. It is a reusable blueprint — versioned, and shareable with your team.
One distinction worth setting early: a template does not generate documents from content blocks or CRM data the way a proposal tool does. You bring the finished PDF; GingerDocs makes it reusable. That keeps the original file intact, which is the whole point of the platform.
Create a template: two starting points
Open Templates from the sidebar. The library lists every template you can use, with tabs for All, Created by me, Archived, and Bin. There are two ways to add one:
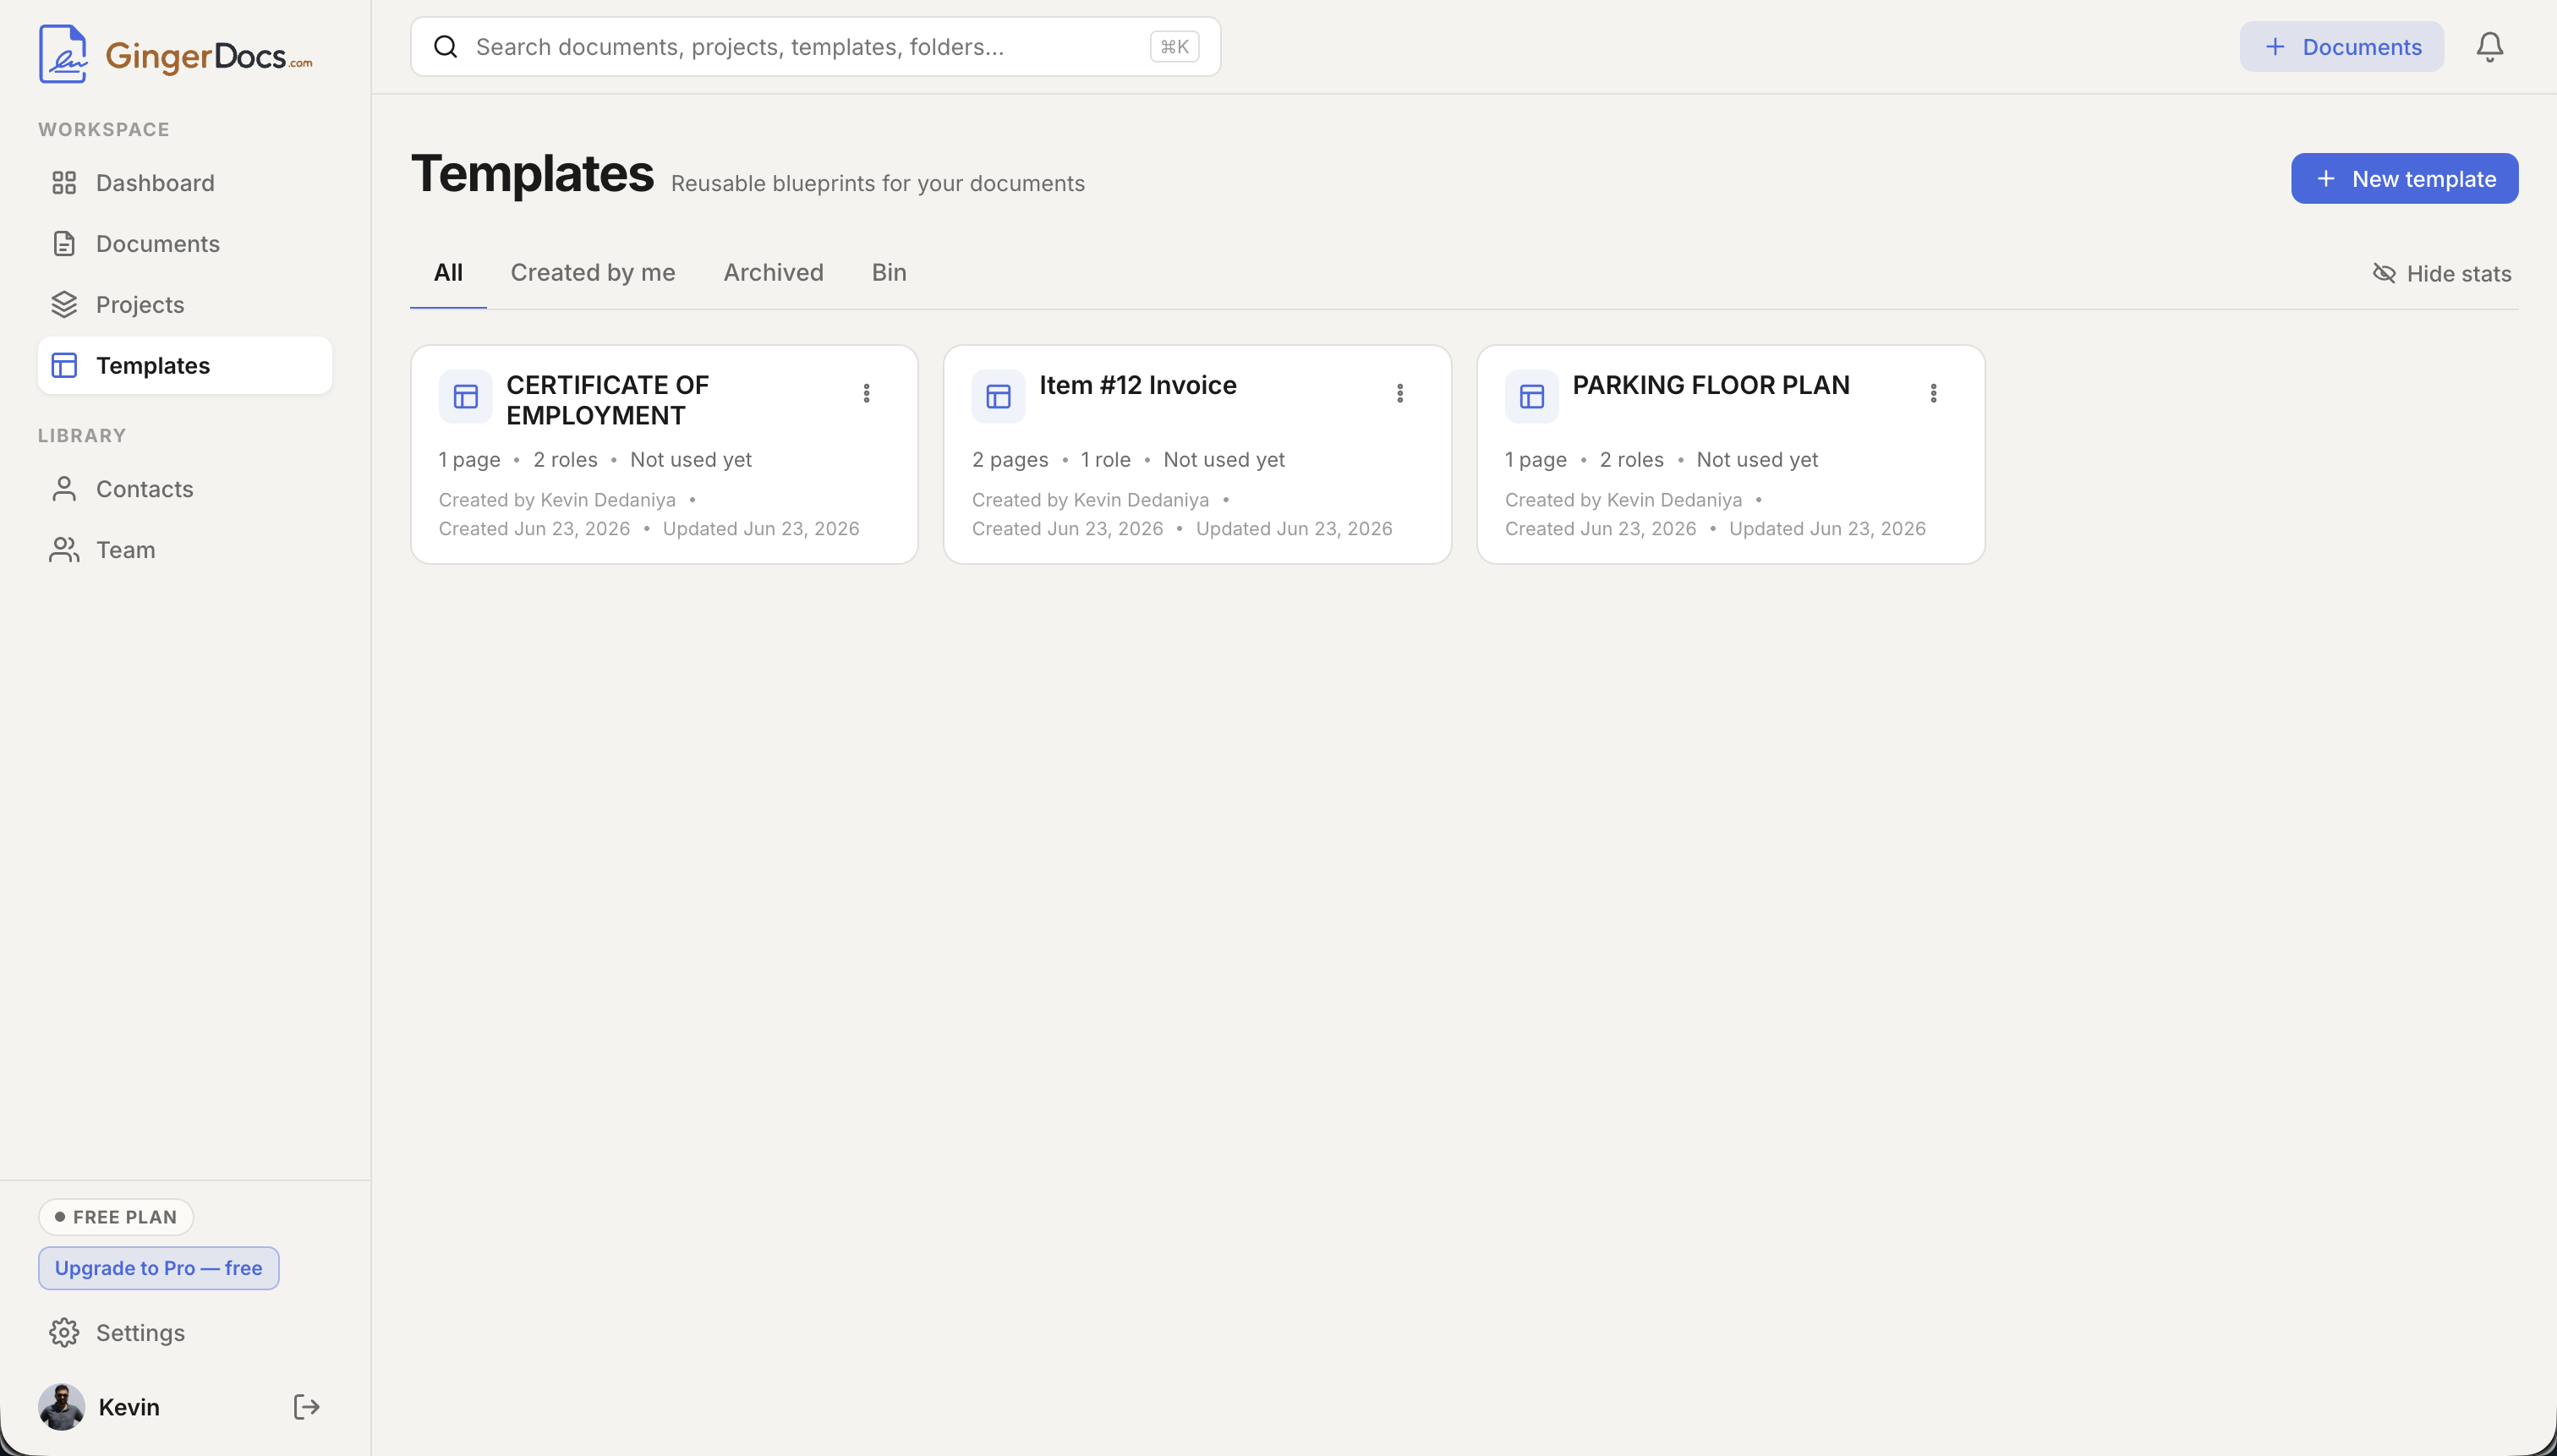
- From a PDF — click New template, give it a name (“Certificate of Employment”), choose its visibility, and drop in the PDF. GingerDocs uploads it and opens it straight in the field editor when you click Create & add fields.
- From a finished draft — open any document and choose Save as template. GingerDocs captures its layout, fields, and roles, and clears the filled-in values (recipient names, signatures, dates) so the template stays a clean blueprint. The original document is never touched.
Map fields to roles, not people
This is the idea that makes a template reusable. In a normal document you assign each field to a named recipient; in a template you assign it to a role — an abstract slot like Employee or HR Manager. The editor reminds you with a banner: “fields map to roles, not people.” You attach the actual people only later, when you use the template.
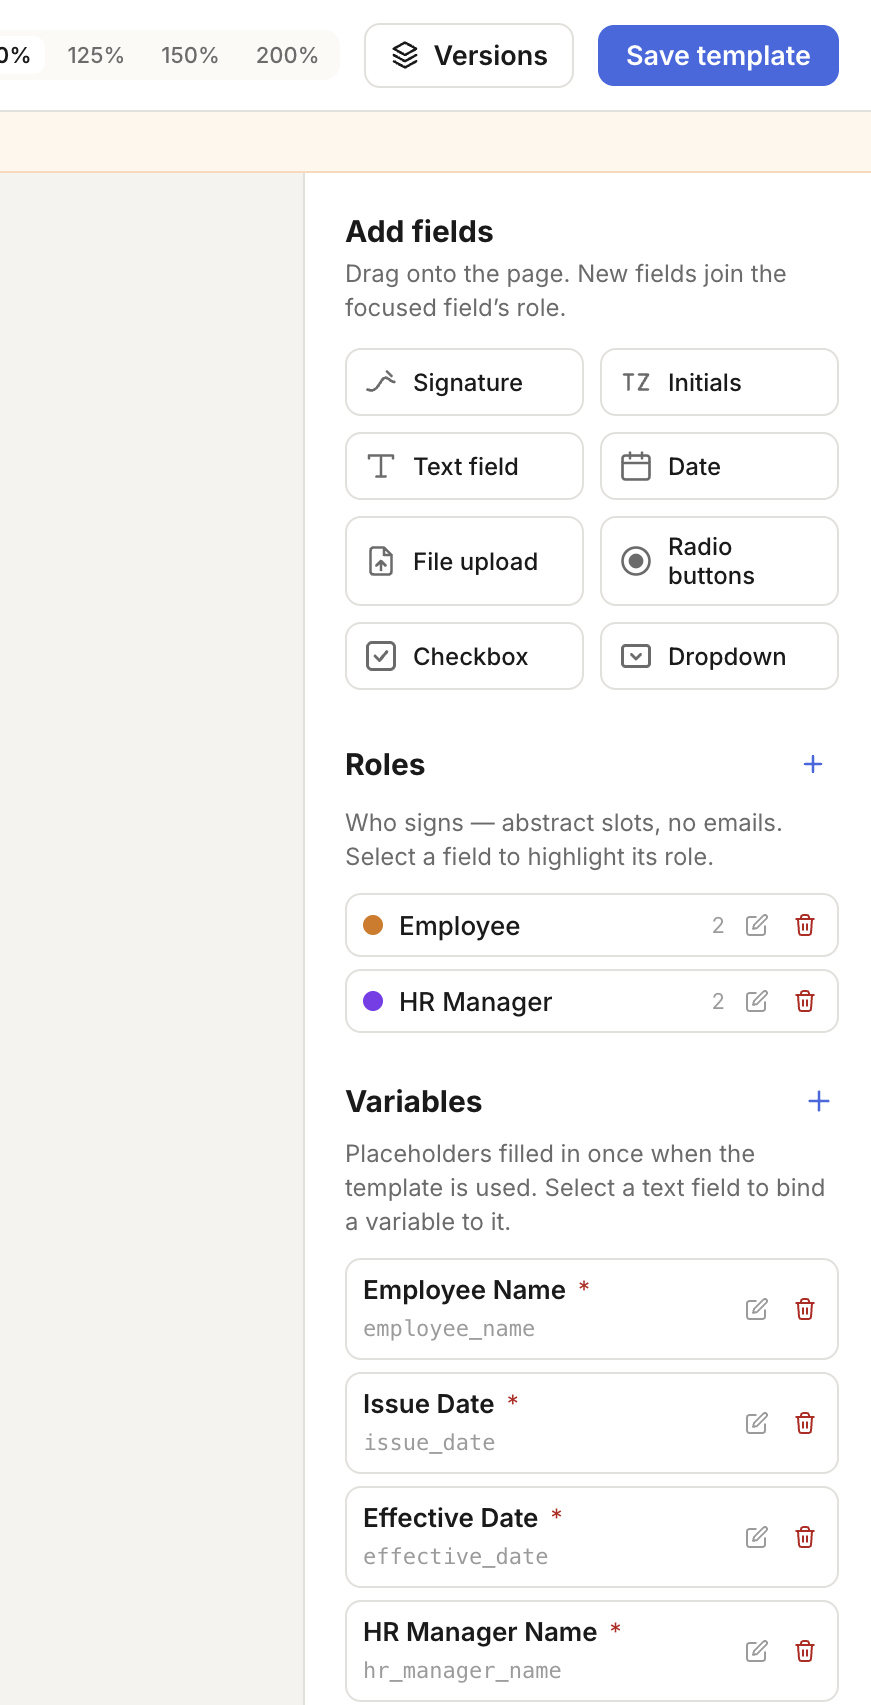
In the editor’s Roles panel, click the plus to add a role and name it (Employee, HR Manager, and so on). Each role gets its own colour. Then drag field types from Add fields onto the page — new fields join the currently focused field’s role, and selecting a field highlights the role that owns it. Eight field types are available: signature, initials, text, date, file upload, radio buttons, checkbox, and dropdown (the same set covered in how to edit a PDF).
Some fields are not for a signer at all — a reference number you fill in, an internal date. Mark a role as “Filled by sender (no email)” and its fields become yours to complete when you generate the document, with no signing invitation attached.
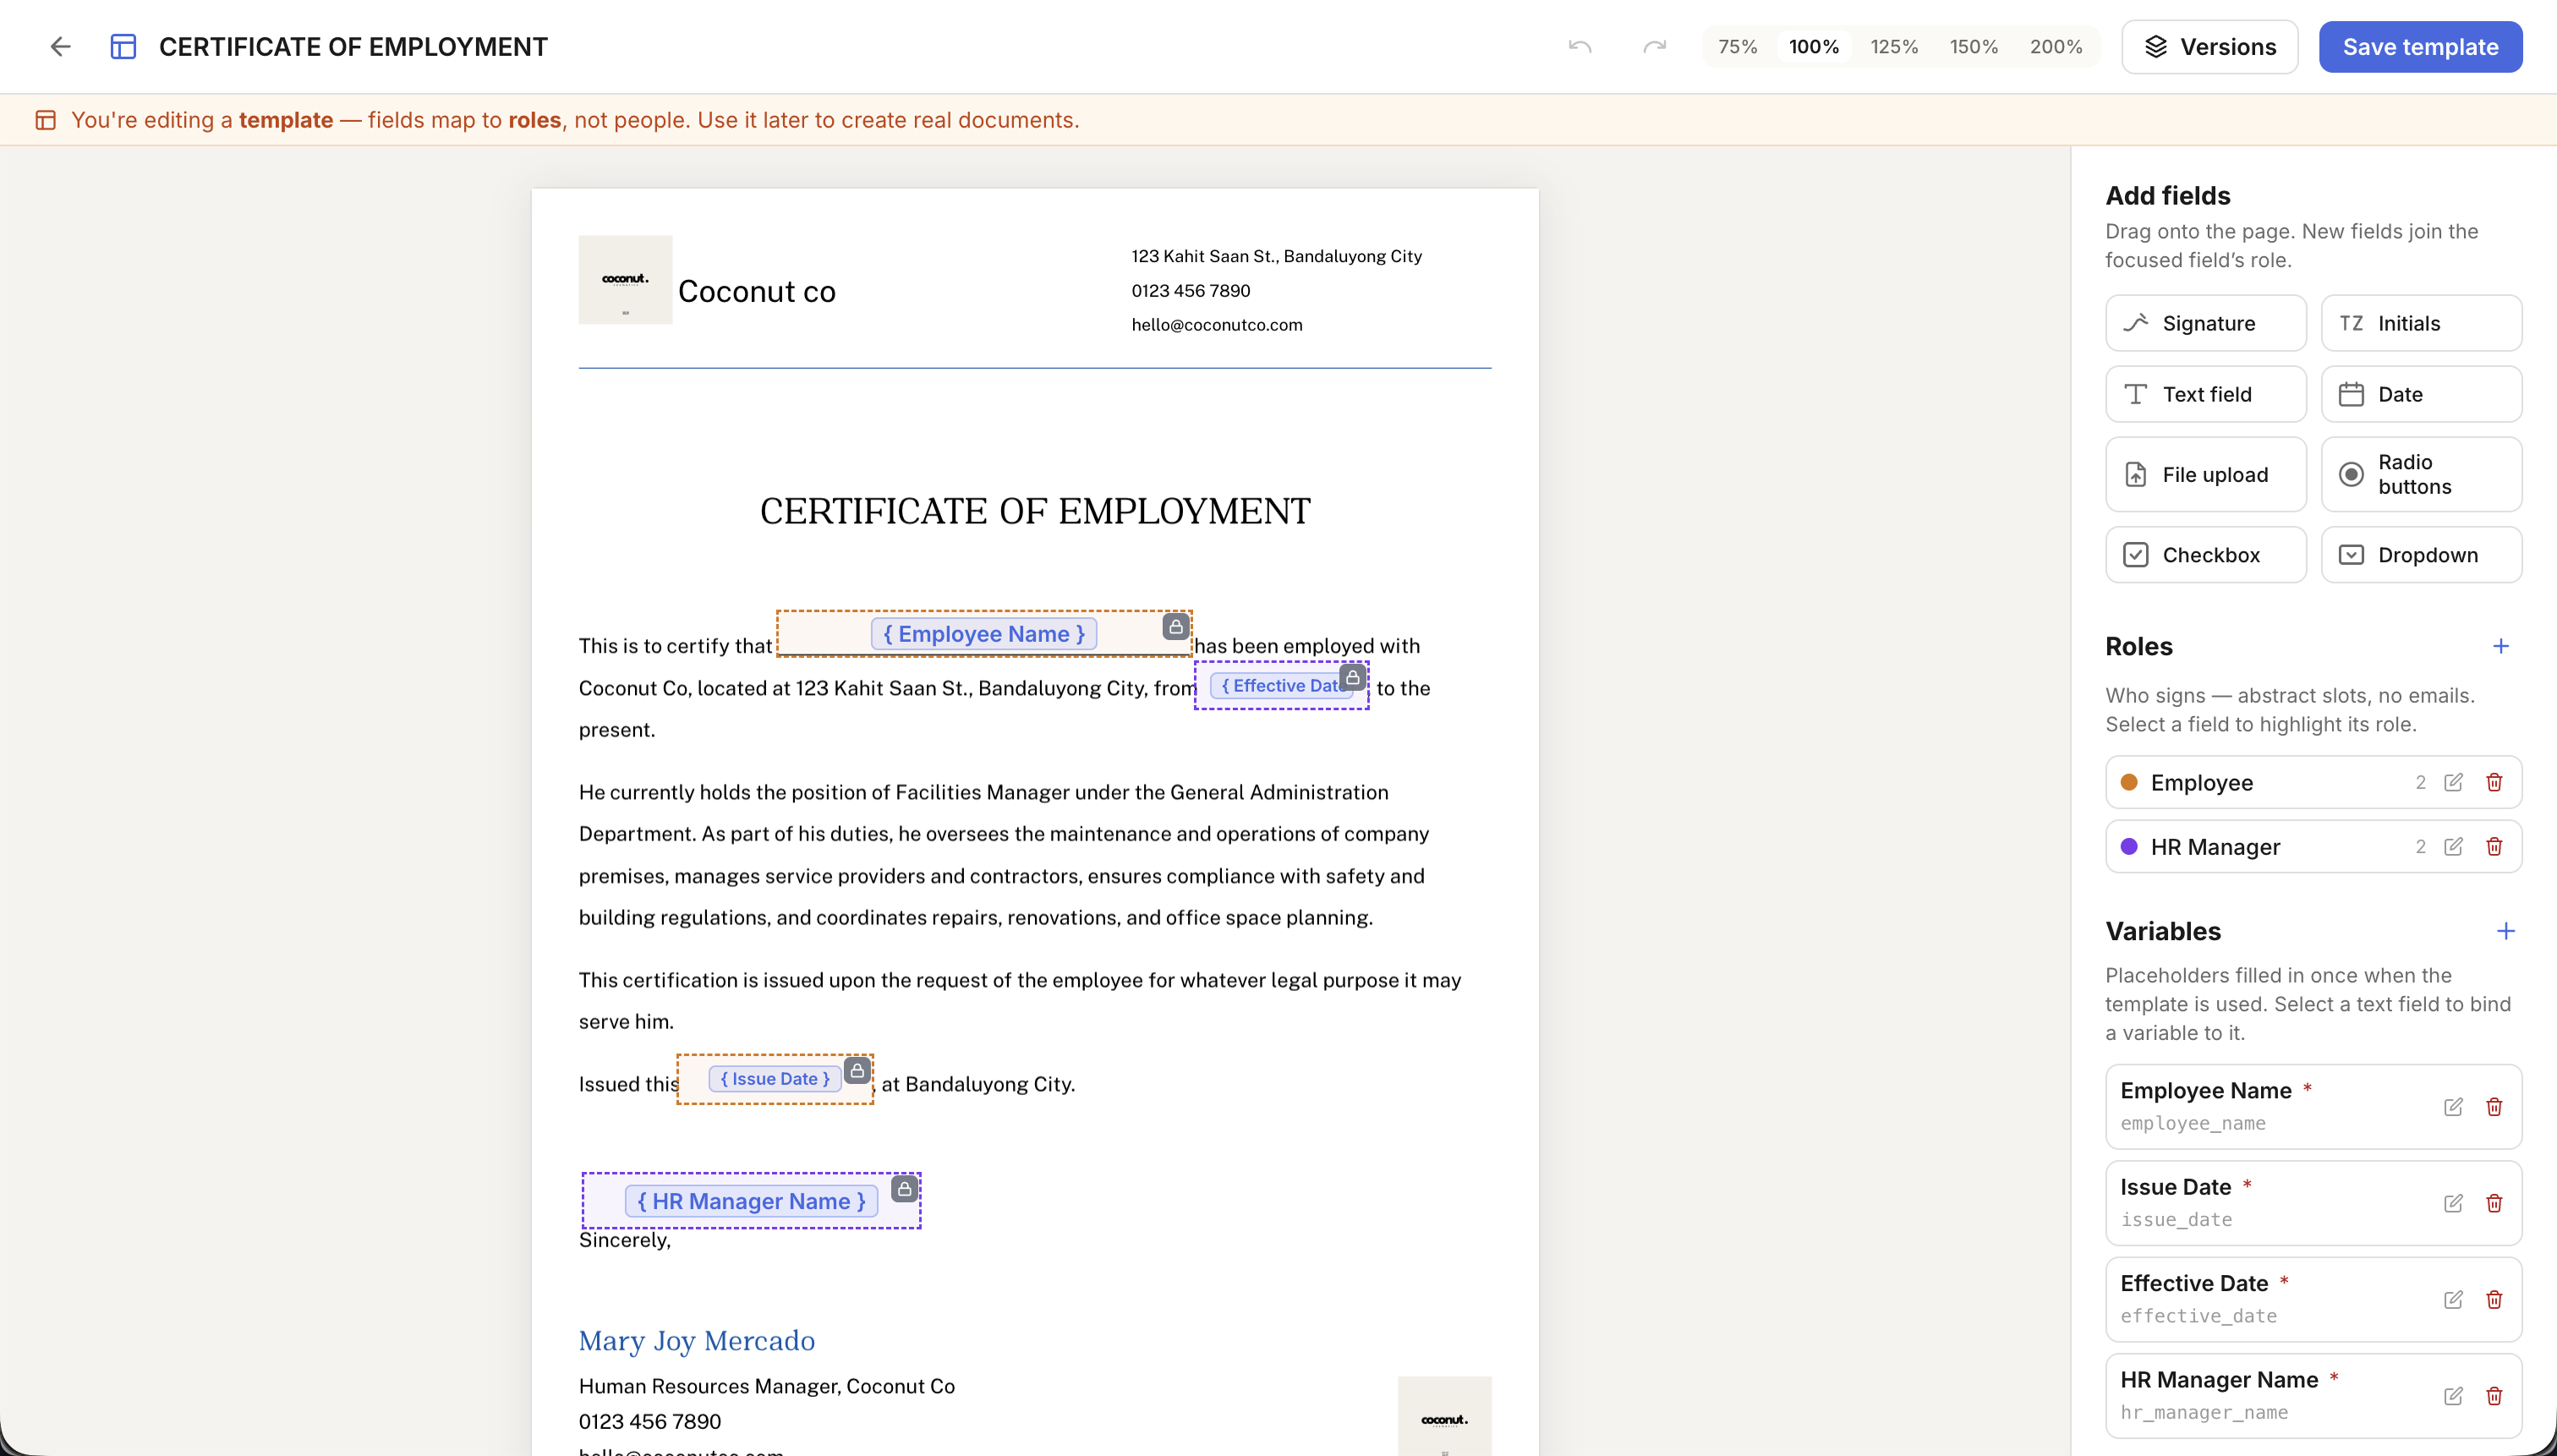
Add variables for the details that change
Variables are placeholders filled in once when the template is used — the employee’s name, an issue date, an effective date. Open the Variables panel and click Add variable: give it a label (“Employee Name”), accept or edit the auto-suggested key (employee_name), pick a type (text, date, or number), set an optional default, and tick “Required to use the template” if it must always be filled.
To put a variable on the page, select a text field and click Bind on the variable — the field now draws its value from that variable every time the template is used. Our certificate uses four, all required: Employee Name, Issue Date, Effective Date, and HR Manager Name. The result: one template where every changing detail flows in automatically instead of being retyped.
Version, duplicate, and organize
Templates evolve, so GingerDocs keeps their history. Open Base PDF history in the editor to upload a new version of the underlying PDF or restore an older one. Documents already created from the template keep the exact version they were built from, so updating a template never rewrites work already in flight.
A few more housekeeping tools live on each template’s actions menu: Duplicate to branch a variant without disturbing the original, Archive to retire a template into the Archived tab, and Delete to send it to the Bin — where, like documents and folders, it can be restored. Visibility is set per template: Team makes it available to everyone in your workspace, Only me keeps it private.
Use a template: one document, or a hundred
From the library, Use template opens the New documents screen. The model is deliberately simple: add a row per document — type them in or import a CSV — with one signer per role, per row. One row creates one document; many rows create many. The same screen does both.
For a single send, add one row, fill in the signer for each role and any required variables, and you are done. Anything that does not change between documents — a fixed counter-signer from your own team, a constant variable — can be switched on under “Same for every document,” so you set it once instead of repeating it in every row. If the template has sender-filled fields, a second step lets you complete them, either identically across documents or per document.
Each document also gets a name its recipients will see — insert columns or generic tokens (a date, a sequence number, a unique number) to keep names distinct across a batch. Before you generate, choose the outcome under Sending: send each document for signing immediately, or create drafts to review first. With more than one signer you can also pick “Everyone at once” (parallel) or “One after another” (sequential) — the same routing covered in the send-and-sign guide. The documents you create are grouped together into a project so the whole batch stays together.
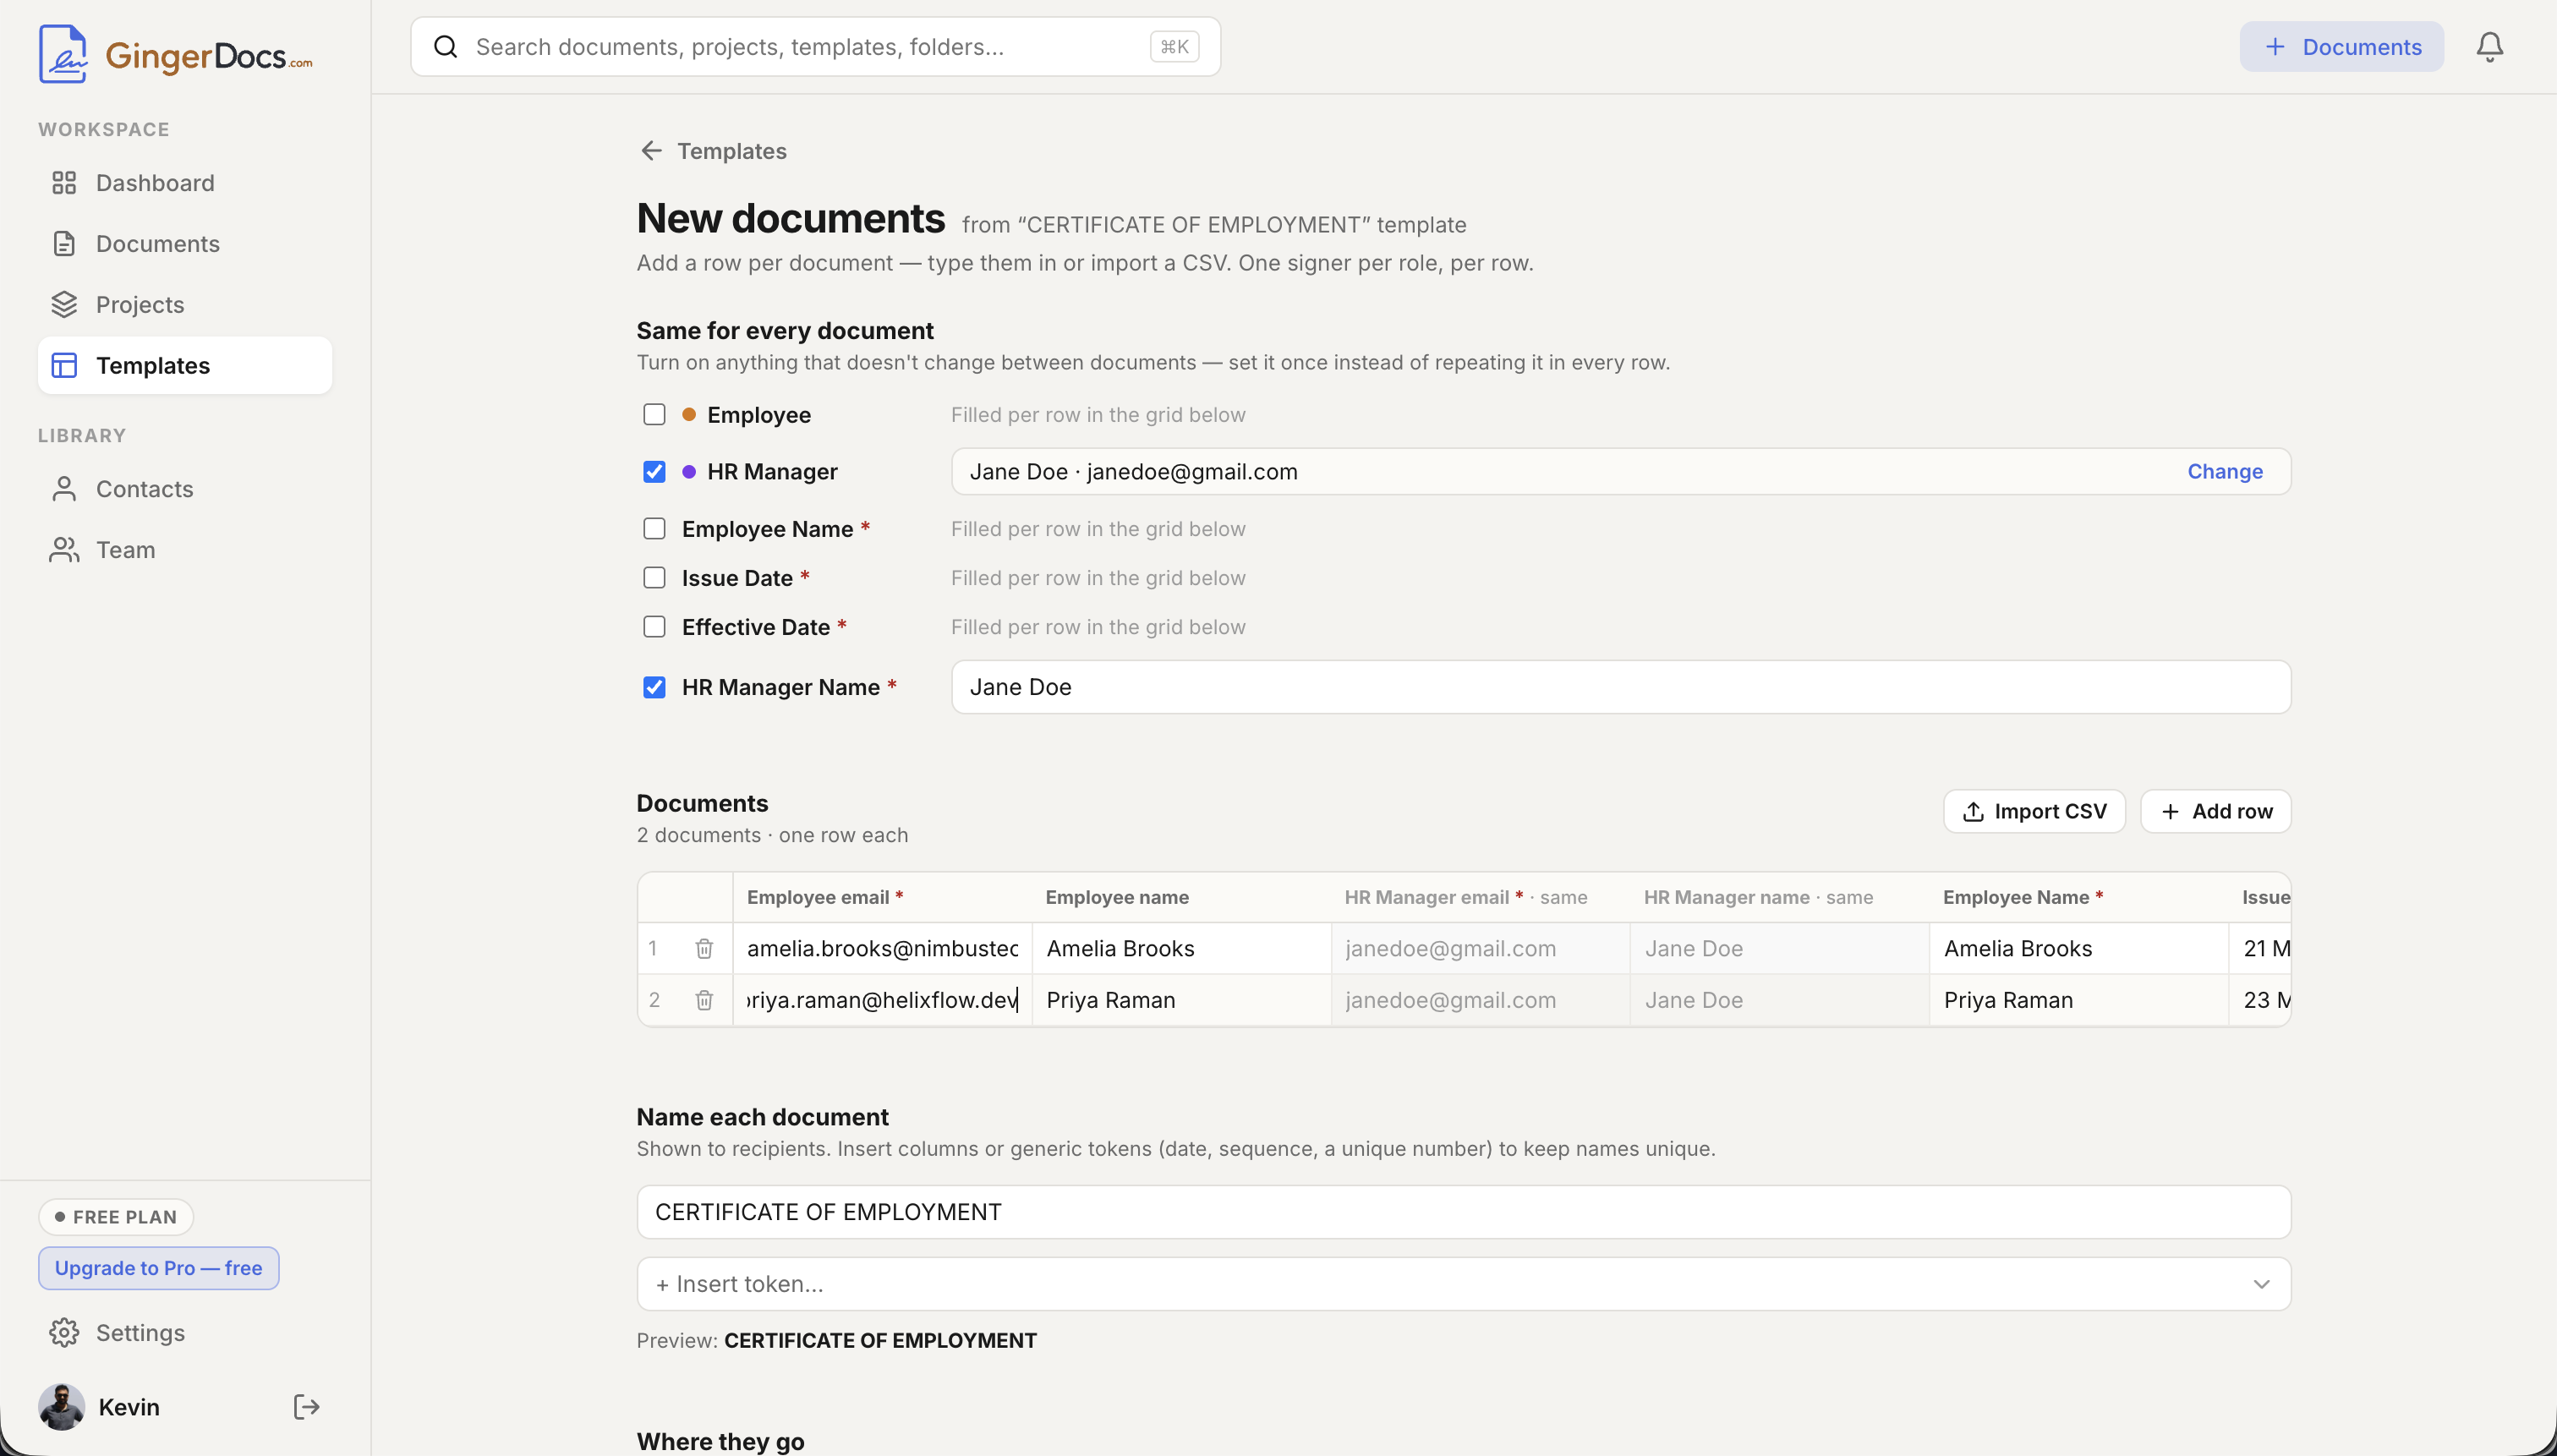
Bulk send from a CSV, tracked row by row
Scale is just more rows. Import a CSV and each line becomes a personalised document — its columns feed the template’s roles and variables, so a roster of fifty new hires turns into fifty certificates in one run. You can append more rows or fix entries before generating.
When you start the run, GingerDocs queues it and processes it row by row, showing live progress with per-row success and failure counts — so a bad email address in row 34 is visible, not silent. Finished runs are saved under Recent runs, and Open as project drops you into the project holding every document the run created, ready to track to completion like any other.
Measure adoption with usage insights
A strip across the top of the Templates library reports whether templates are actually paying off: how many documents have been created from templates, how many were sent for signing, the share of your sent documents that start from a template, and the average time to send. It appears once at least one document has come from a template — a quick gut-check on whether the blueprints are saving the time they promised.
Quick reference
| I want to… | Where |
|---|---|
| Create a template from a PDF | Templates → New template |
| Turn a finished draft into a template | Open the document → Save as template |
| Add or rename roles | Template editor → Roles panel |
| Mark a role as sender-filled | Role form → “Filled by sender (no email)” |
| Add a merge variable | Template editor → Variables → Add variable |
| Put a variable on the page | Select a text field → Bind on the variable |
| Update or restore the PDF | Template editor → Base PDF history |
| Duplicate, archive, or delete | Template card → actions menu |
| Create one or many documents | Template → Use template → add rows or import a CSV |
| Keep batch document names unique | New documents → Name each document → insert tokens |
| Track a bulk run | New documents → Recent runs → Open as project |
That is the whole loop: build once, reuse forever, and scale from one document to hundreds without rebuilding anything. For where templates and bulk send sit in the wider product, see the product overview; to follow a single document from upload to signed, start with getting started.